
The purpose of this step-by-step guide is to provide instructions on how to adjust the watering settings on a smart irrigation system. A smart irrigation system is an automated system that uses technology to monitor weather conditions and soil moisture levels to efficiently water plants and lawns. By following this guide, users will be able to navigate the settings of their smart irrigation system and make the necessary adjustments to ensure optimal watering for their landscape.
Top-Selling Water-Saving Solutions for Your Garden
A Guide on Setting Up a SMART-WATERING SYSTEM to Conserve Water using RainPoint
Understanding the Smart Irrigation System
In order to comprehend the functioning of a smart irrigation system, it is essential to grasp its basic functionality and components. A smart irrigation system is an automated solution that uses sensors, weather data, and real-time information to efficiently water plants. The system consists of three main components: the controller, the sensors, and the valves. The controller is the brain of the system and is responsible for receiving data from the sensors and activating the valves accordingly. The sensors are strategically placed in the soil or weather stations to measure moisture levels, temperature, and rainfall. Lastly, the valves control the flow of water to the different zones of the irrigation system.
Adjusting watering settings is crucial for both efficient water usage and maintaining plant health. By customizing the watering schedule based on real-time data, such as moisture levels and weather conditions, users can avoid overwatering, which not only wastes water but can also lead to root rot and other plant diseases. Additionally, adjusting the watering settings allows users to optimize water usage by avoiding watering during periods of rainfall or high humidity. This not only saves water but also promotes plant health by preventing waterlogging and reducing the risk of fungal growth.
To illustrate this, let’s consider an example. Suppose you have a smart irrigation system installed in your garden. By accessing the controller’s interface, you can set the desired moisture level for each zone based on the type of plants in that area. For instance, you may set a higher moisture level for a zone with water-loving plants, while a lower moisture level may be appropriate for a zone with drought-tolerant plants. By analyzing the weather data received from the sensors, the system can adjust the watering schedule accordingly. If it detects that the soil moisture level is already sufficient due to recent rainfall, it will skip watering that zone to avoid overwatering. As a result, you can ensure efficient water usage and promote the health of your plants.

Accessing the Smart Irrigation System Settings
To access the settings menu of your smart irrigation system, follow these simple steps:
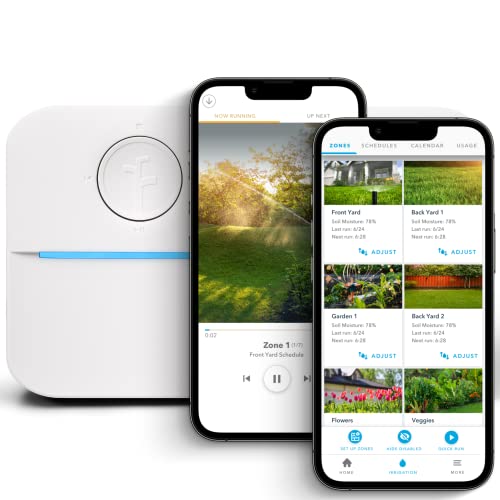
- Using a Mobile App:
- Open the mobile app associated with your smart irrigation system on your smartphone or tablet.
- Log in to your account using your credentials or create a new account if you haven’t already.
- Once logged in, navigate to the main menu or settings section within the app. This may be denoted by an icon with three horizontal lines or a gear symbol.
- In the settings menu, you will find various options to configure and customize your smart irrigation system. These may include setting watering schedules, adjusting nozzle types, or managing sensor settings. Select the specific option you wish to modify and make the necessary adjustments as desired.
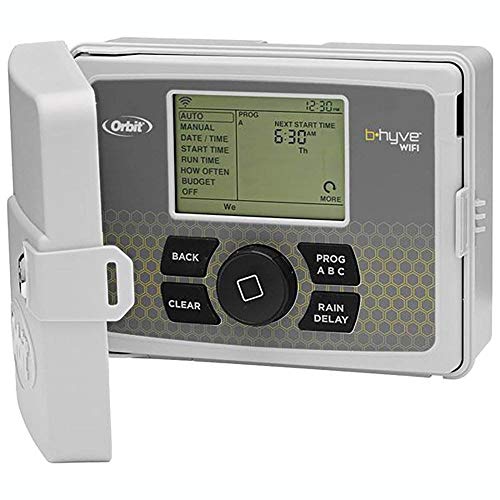
- Using a Control Panel:
- Locate the control panel of your smart irrigation system. This is usually installed near the main water supply or irrigation control box.
- Depending on the model and manufacturer of your system, the control panel may have physical buttons, a touchscreen display, or a combination of both.
- Press the designated button or navigate to the settings option on the control panel. This could be labeled as “Settings,” “Menu,” or represented by an icon resembling a gear or tool.
- Once in the settings menu, scroll or navigate to the specific setting you want to modify. Use the control panel’s interface to make the desired changes. Follow any on-screen prompts or instructions provided by the system.
Remember, if you are accessing the smart irrigation system settings through a web interface, the process may vary depending on the platform or software being used. Always consult the user manual or online documentation specific to your smart irrigation system for detailed instructions.
Navigating to the Watering Settings
To access the specific watering settings within the system’s interface, follow these steps:
- Log in: Start by logging into the system using your username and password.
- Navigate to the main menu: Once logged in, locate the main menu or home screen, usually found at the top or left-hand side of the interface.
- Select the ‘Watering’ or ‘Schedule’ option: In the main menu, look for an option labeled ‘Watering’ or ‘Schedule’ and click on it. This option may also be located within a sub-menu, such as ‘Settings’ or ‘Configuration’.
- Explore available settings: Once you have selected the ‘Watering’ or ‘Schedule’ option, you will be taken to a page that displays the available watering settings. This page may include options such as duration, frequency, start time, and specific zones or areas to be watered.
- Adjust settings: To customize your watering preferences, review the available options and make adjustments according to your needs. For example, you may want to set the duration of each watering session, specify the days or times when watering should occur, or determine which zones should be watered.
Remember to save your changes after adjusting the watering settings to ensure they are applied to your system. You may also have the option to set up multiple schedules or programs for different zones or areas in your garden or landscape. By following these steps, you will be able to easily navigate to the specific watering settings within the system’s interface and make the necessary adjustments to suit your watering requirements.
Adjusting the Watering Settings
Adjusting the watering settings on our system is a straightforward process that allows you to customize the duration, frequency, and specific zones for watering. To modify the duration, access the watering settings menu on the control panel. Locate the option for adjusting the duration and select it. Enter the desired duration using the numeric keypad or the up/down buttons. For instance, to increase the watering duration to 15 minutes, press the up button until you reach 15 on the display. Confirm your selection by pressing the “Enter” button.
To adjust the frequency of watering, navigate to the watering settings menu and find the option for modifying the frequency. Select it and choose from the available options, such as daily, every other day, or specific days of the week. For example, to set the system to water every other day, select the “every other day” option and confirm your choice.
In addition to basic adjustments, our system offers advanced features and customization options. For instance, you can set up specific zones for watering different areas of your garden or lawn. To create custom zones, access the zone settings menu on the control panel. Select the option to add a new zone and follow the on-screen instructions to define the area and watering parameters for each zone. This allows you to tailor the watering settings to the unique needs of each zone, such as adjusting the duration or frequency for a flowerbed or a lawn area.
Saving and Verifying the Changes
To save the newly adjusted watering settings and ensure they have been applied correctly, follow these simple instructions:
- Navigate to the settings menu on your irrigation system controller.
- Locate the “Save Changes” option and select it.
- A confirmation message should appear on the screen indicating that the changes have been successfully saved.
- Take note of any error messages or warnings that may appear during the saving process, as they could indicate that there was a problem in applying the changes.
- If you encounter any errors, review the settings you have adjusted and make any necessary corrections before attempting to save again.
To test the system or monitor the irrigation schedule, use the following guidance:
- Set up a test zone or area in your garden or landscape where you can observe the watering in action.
- Make sure the system is set to its regular irrigation schedule or the specific time you want to test.
- Observe the watering actions and ensure that the correct zones are being activated and the water is being distributed evenly.
- If there are any issues or discrepancies, revisit the settings menu and double-check the programmed schedule and zone configurations.
- Repeat the test if necessary or make further adjustments to the settings to achieve the desired watering outcomes.
Remember, regular monitoring and testing of your irrigation system will help ensure that your plants receive the appropriate amount of water, promoting healthy growth and conserving water resources.
Key Takeaways
In conclusion, adjusting the watering settings on a smart irrigation system is a crucial step towards both water conservation and ensuring the optimal care of your plants. By following the steps outlined in this guide, you can effectively customize the watering schedule and duration to meet the specific needs of your landscape. This will not only help reduce water waste but also promote healthier plant growth. Remember, taking the time to fine-tune your smart irrigation system settings will result in significant benefits for both the environment and your garden.
The information provided in this guide is really helpful. I can see how adjusting the watering settings on a smart irrigation system can be beneficial in conserving water and ensuring that plants receive the right amount of water. In my neighborhood, there is a community garden that could greatly benefit from implementing a smart irrigation system. I will share this guide with them so they can make the most out of their watering practices.
Thank you for your comment! We’re glad you found the information helpful and see the real-world application of adjusting the watering settings on a smart irrigation system. Sharing this guide with your community garden is a great idea, and we hope it will help them improve their watering practices and conserve water. If you have any other suggestions or questions, feel free to let us know!
I followed this guide to adjust the watering settings on my smart irrigation system and it worked perfectly! The instructions were clear and easy to follow. I was able to access the settings and make the necessary adjustments without any issues. Now my plants are getting the right amount of water at the right time, and I’ve noticed a significant improvement in their health. Thank you for this helpful guide!
Thank you for sharing your positive experience with the guide! We’re thrilled to hear that you were able to successfully adjust the watering settings on your smart irrigation system and that it has made a noticeable difference in your plants’ health. If you have any further questions or need assistance with anything else, feel free to ask!
I appreciate the step-by-step instructions provided in this guide, but I have a different perspective on smart irrigation systems. While they can be convenient and efficient, I believe that relying too much on technology for watering plants may lead to a lack of connection with nature. I prefer to manually adjust my watering settings based on my observation of the plants and the weather conditions. However, I understand that smart irrigation systems can be useful for people with busy schedules or large gardens.
Thank you for sharing your perspective on smart irrigation systems. It’s true that finding a balance between technology and a hands-on approach is important when it comes to gardening. While smart irrigation systems offer convenience and efficiency, it’s perfectly valid to prefer a more manual approach based on personal observation. We appreciate your input and understand that different gardeners have different preferences. If you have any other thoughts or questions, feel free to share!